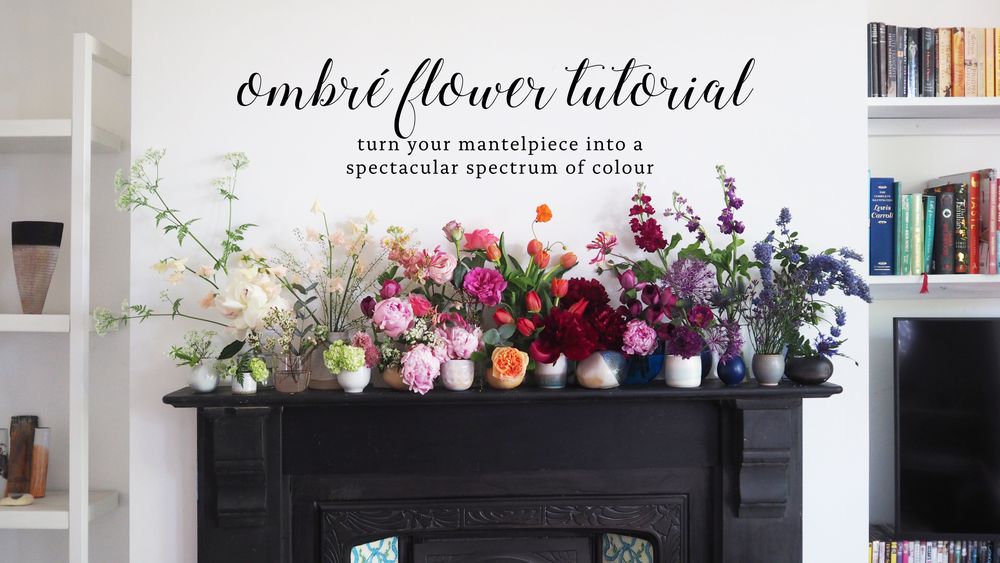
How To Make A Ombré Flower

Ombré flowers are really popular at weddings, but why save this trend for your bridal bouquet when you can have a spectacular spectrum of colour in your living room any day of the week? In this tutorial, we’re going to show you how to create an amazing ombré mantelpiece without using any flower foam or floral tape - it’s not nearly as hard to do as it looks... and if you keep replacing any faded blooms with fresh ones, you can keep it going for weeks.
What you will need:
-
a nice big selection of flowers in various shades and sizes*
-
lots of vases, jars, jugs, pots and bottles
-
sharp scissors or secateurs
-
string or twine
-
water
How to create your Ombre Mantelpiece
Step 1
Start by choosing your flowers – go for ones that are in season and in colours that you love. Don’t be afraid to mix store-bought flowers with ones cut from your garden. For my ombré mantelpiece I used pale pink peonies, scabiosa, eucalyptus cinerea, astrantia major and viburnum opulus from Arena’ Flower’s Odile bouquet along with luxurious dark chocolate and pale white peonies, scented stocks, flowers cut from my garden and allotment – alliums, roses, centaurea montana, geums, sweet peas, tulips, honeysuckle and ceanothus – and some foraged cow parsley.
Step 2
Decide on the shades of your colour fade, where it will start and finish, and what your mid-tones will be. It could be pale yellows to deep chocolate blooms, peachy tones to vibrant lime greens, or the pinks to purples of a cottage garden. I went with the white of Anthriscus sylvestris (cow parsley) to the deep blue of centaurea montana, with a Bathsheba Rose as my central mid-tone, using the pages of one of my favourite books, The Secret Lives of Colour by Kassia St Clair, but chose to miss out the more yellow hues.
Step 3
Gather all your vases, jars, jugs, pots and bottles. Make sure they are washed and clean. A mix of ceramic and glass works well – you can even try teacups, mugs and pudding pots (you might spot some pink and green drinking glasses from Ikea and glass yoghurt pots in mine). Try to get a variety of heights and sizes. Fill all your pots with water. Don’t do what I did and miss any out because then your flowers will die :(
Step 4
Start arranging all your pots on your mantelpiece, with the lightest ones at the left and the brighter or darker ones on the right. Place tall bottles or vases at the back and smaller ones at the front. You can always hide the more boring ones behind prettier, handmade pots, as they’ll probably be covered by flowers anyway.
Step 5
Start your ombré flower arrangement by picking out your palest blooms and placing the tallest, palest flowers at the back left. The idea is to work from left to right, with the lightest colours on the left, moving through the spectrum to the darkest flowers on the right. Generally, tall stems go at the back and small blooms get popped in at the front, but you want to mix it up with some larger blooms at the front, to avoid it looking too formal.
TIP: When preparing your flowers, snip off any leaves that will be underwater and always cut your stems at an angle. If you have any vases or pots with wider openings that don’t support the flowers so well, tie them in bunches by wrapping twine or string around their stems. This keeps them together and upright without having to use flower foam (which I hate).
Step 6
Once your first palest blooms are in place, move on to the next hue, selecting the flowers that are slightly deeper in pigment than your first. Position these to the right of your very pale blooms, but mix in a few darker blooms or acid greens, so the fade feels more natural. This is where you start to see the ombré effect taking shape.
Step 7
Keep moving across from left to right, adding in darker shades as you go. You want to place your mid-tone flowers at the centre of the mantelpiece as an anchor. In this display, the mid-tones were the peachy oranges of the Bathsheba Rose and the Tangerine Dream geum. After your mid-tones come your deeper, richer hues, followed by the darkest flowers in your spectrum at the front right.
Step 8
Stand back and have a look at your ombre display. Does the fade work? Are there any flowers that feel out of place or any gaps that need filling? If you’ve run out of flowers but feel like there spaces that need something, try something green or cut some leaves from your garden - green is always good as a backdrop and helps make all your flowers sing.
That’s it! Your Floral Ombré Mantelpiece is ready to worship. And if you can keep topping up your pots with water and replacing any faded blooms with fresh flowers and it could last for weeks!
Follow us on Instagram for more ideas & beautiful photos of our flowers, or head over to our flower collections to place an order.